Note
Click here to download the full example code
DGL Basics
Author: Minjie Wang, Quan Gan, Yu Gai, Zheng Zhang
The Goal of this tutorial:
- To create a graph.
- To read and write node and edge representations.
Graph Creation
The design of DGLGraph was influenced by other graph libraries. Indeed,
you can create a graph from networkx, and convert it into a DGLGraph and
vice versa:
import networkx as nx
import dgl

g_nx = nx.petersen_graph()
g_dgl = dgl.DGLGraph(g_nx)

import matplotlib.pyplot as plt
plt.subplot(121)
nx.draw(g_nx, with_labels=True)
plt.subplot(122)
nx.draw(g_dgl.to_networkx(), with_labels=True)

plt.show()
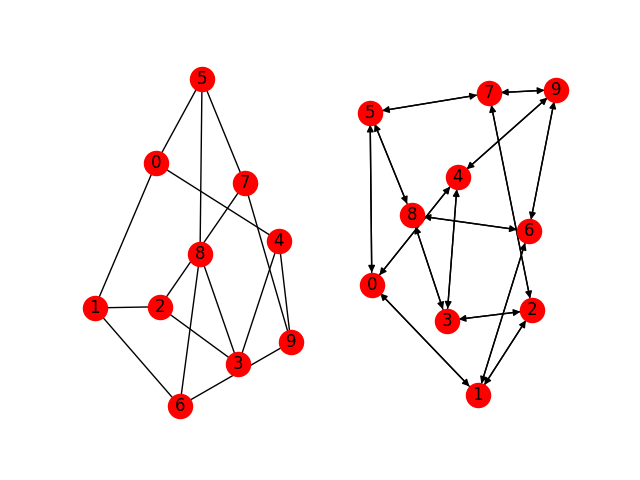
They are the same graph, except that DGLGraph is always directional.
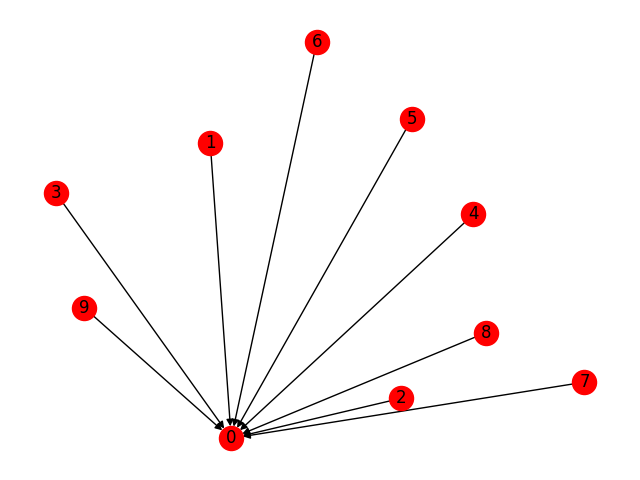
One can also create a graph by calling DGL’s own interface.
Now let’s build a star graph. DGLGraph nodes are consecutive range of
integers between 0 and number_of_nodes()
and can grow by calling add_nodes.
DGLGraph edges are in order of their additions. Note that
edges are accessed in much the same way as nodes, with one extra feature
of edge broadcasting:
import dgl
import torch as th

g = dgl.DGLGraph()
g.add_nodes(10)
# a couple edges one-by-one
for i in range(1, 4):
    g.add_edge(i, 0)
# a few more with a paired list
src = list(range(5, 8)); dst = [0]*3
g.add_edges(src, dst)
# finish with a pair of tensors
src = th.tensor([8, 9]); dst = th.tensor([0, 0])
g.add_edges(src, dst)

# edge broadcasting will do star graph in one go!
g.clear(); g.add_nodes(10)
src = th.tensor(list(range(1, 10)));
g.add_edges(src, 0)

import networkx as nx
import matplotlib.pyplot as plt
nx.draw(g.to_networkx(), with_labels=True)
plt.show()
Feature Assignment
One can also assign features to nodes and edges of a DGLGraph. The
features are represented as dictionary of names (strings) and tensors,
called fields.
The following code snippet assigns each node a vector (len=3).
Note
DGL aims to be framework-agnostic, and currently it supports PyTorch and MXNet tensors. From now on, we use PyTorch as an example.
import dgl
import torch as th

x = th.randn(10, 3)
g.ndata['x'] = x
ndata is a syntax sugar to access states of all nodes,
states are stored
in a container data that hosts user defined dictionary.
print(g.ndata['x'] == g.nodes[:].data['x'])

# access node set with integer, list, or integer tensor
g.nodes[0].data['x'] = th.zeros(1, 3)
g.nodes[[0, 1, 2]].data['x'] = th.zeros(3, 3)
g.nodes[th.tensor([0, 1, 2])].data['x'] = th.zeros(3, 3)
Out:
tensor([[1, 1, 1],
        [1, 1, 1],
        [1, 1, 1],
        [1, 1, 1],
        [1, 1, 1],
        [1, 1, 1],
        [1, 1, 1],
        [1, 1, 1],
        [1, 1, 1],
        [1, 1, 1]], dtype=torch.uint8)
Assigning edge features is in a similar fashion to that of node features, except that one can also do it by specifying endpoints of the edges.
g.edata['w'] = th.randn(9, 2)

# access edge set with IDs in integer, list, or integer tensor
g.edges[1].data['w'] = th.randn(1, 2)
g.edges[[0, 1, 2]].data['w'] = th.zeros(3, 2)
g.edges[th.tensor([0, 1, 2])].data['w'] = th.zeros(3, 2)

# one can also access the edges by giving endpoints
g.edges[1, 0].data['w'] = th.ones(1, 2)                 # edge 1 -> 0
g.edges[[1, 2, 3], [0, 0, 0]].data['w'] = th.ones(3, 2) # edges [1, 2, 3] -> 0
After assignments, each node/edge field will be associated with a scheme containing the shape and data type (dtype) of its field value.
print(g.node_attr_schemes())
g.ndata['x'] = th.zeros((10, 4))
print(g.node_attr_schemes())
Out:
{'x': Scheme(shape=(3,), dtype=torch.float32)}
{'x': Scheme(shape=(4,), dtype=torch.float32)}
One can also remove node/edge states from the graph. This is particularly useful to save memory during inference.
g.ndata.pop('x')
g.edata.pop('w')
Multigraphs
Many graph applications need multi-edges. To enable this, construct DGLGraph
with multigraph=True.
g_multi = dgl.DGLGraph(multigraph=True)
g_multi.add_nodes(10)
g_multi.ndata['x'] = th.randn(10, 2)

g_multi.add_edges(list(range(1, 10)), 0)
g_multi.add_edge(1, 0) # two edges on 1->0

g_multi.edata['w'] = th.randn(10, 2)
g_multi.edges[1].data['w'] = th.zeros(1, 2)
print(g_multi.edges())
Out:
(tensor([1, 2, 3, 4, 5, 6, 7, 8, 9, 1]), tensor([0, 0, 0, 0, 0, 0, 0, 0, 0, 0]))
An edge in multi-graph cannot be uniquely identified using its incident nodes
\(u\) and \(v\); query their edge ids use edge_id interface.
eid_10 = g_multi.edge_id(1, 0)
g_multi.edges[eid_10].data['w'] = th.ones(len(eid_10), 2)
print(g_multi.edata['w'])
Out:
tensor([[ 1.0000,  1.0000],
        [ 0.0000,  0.0000],
        [-0.2588,  0.3623],
        [ 2.8029,  0.5967],
        [-1.7736,  1.1910],
        [ 0.3487,  0.6900],
        [-1.3407, -0.8081],
        [-2.0258,  0.1400],
        [ 2.6088, -1.0804],
        [ 1.0000,  1.0000]])
Note
- Nodes and edges can be added but not removed; we will support removal in the future.
- Updating a feature of different schemes raise error on individual node (or node subset).
Next steps
In the next tutorial, we will go through the DGL message passing interface by implementing PageRank.
Total running time of the script: ( 0 minutes 0.071 seconds)