Note
Click here to download the full example code
Training GNN with Neighbor Sampling for Node Classification
This tutorial shows how to train a multi-layer GraphSAGE for node
classification on ogbn-arxiv provided by Open Graph
Benchmark (OGB). The dataset contains around
170 thousand nodes and 1 million edges.
By the end of this tutorial, you will be able to
Train a GNN model for node classification on a single GPU with DGL’s neighbor sampling components.
This tutorial assumes that you have read the Introduction of Neighbor Sampling for GNN Training.
Loading Dataset
OGB already prepared the data as DGL graph.
import dgl
import torch
import numpy as np
from ogb.nodeproppred import DglNodePropPredDataset

dataset = DglNodePropPredDataset('ogbn-arxiv')
device = 'cpu'      # change to 'cuda' for GPU
Out:
WARNING:root:The OGB package is out of date. Your version is 1.2.4, while the latest version is 1.3.3.
Downloading https://snap.stanford.edu/ogb/data/nodeproppred/arxiv.zip

  0%|          | 0/81 [00:00<?, ?it/s]
Downloaded 0.00 GB:   0%|          | 0/81 [00:00<?, ?it/s]
Downloaded 0.00 GB:   1%|1         | 1/81 [00:00<00:26,  3.00it/s]
Downloaded 0.00 GB:   1%|1         | 1/81 [00:00<00:26,  3.00it/s]
Downloaded 0.00 GB:   1%|1         | 1/81 [00:00<00:26,  3.00it/s]
Downloaded 0.00 GB:   4%|3         | 3/81 [00:00<00:10,  7.79it/s]
Downloaded 0.00 GB:   4%|3         | 3/81 [00:00<00:10,  7.79it/s]
Downloaded 0.00 GB:   4%|3         | 3/81 [00:00<00:10,  7.79it/s]
Downloaded 0.01 GB:   4%|3         | 3/81 [00:00<00:10,  7.79it/s]
Downloaded 0.01 GB:   4%|3         | 3/81 [00:00<00:10,  7.79it/s]
Downloaded 0.01 GB:   4%|3         | 3/81 [00:00<00:10,  7.79it/s]
Downloaded 0.01 GB:  10%|9         | 8/81 [00:00<00:03, 19.37it/s]
Downloaded 0.01 GB:  10%|9         | 8/81 [00:00<00:03, 19.37it/s]
Downloaded 0.01 GB:  10%|9         | 8/81 [00:00<00:03, 19.37it/s]
Downloaded 0.01 GB:  10%|9         | 8/81 [00:00<00:03, 19.37it/s]
Downloaded 0.01 GB:  10%|9         | 8/81 [00:00<00:03, 19.37it/s]
Downloaded 0.01 GB:  10%|9         | 8/81 [00:00<00:03, 19.37it/s]
Downloaded 0.01 GB:  16%|#6        | 13/81 [00:00<00:02, 27.53it/s]
Downloaded 0.01 GB:  16%|#6        | 13/81 [00:00<00:02, 27.53it/s]
Downloaded 0.01 GB:  16%|#6        | 13/81 [00:00<00:02, 27.53it/s]
Downloaded 0.02 GB:  16%|#6        | 13/81 [00:00<00:02, 27.53it/s]
Downloaded 0.02 GB:  16%|#6        | 13/81 [00:00<00:02, 27.53it/s]
Downloaded 0.02 GB:  16%|#6        | 13/81 [00:00<00:02, 27.53it/s]
Downloaded 0.02 GB:  22%|##2       | 18/81 [00:00<00:01, 32.49it/s]
Downloaded 0.02 GB:  22%|##2       | 18/81 [00:00<00:01, 32.49it/s]
Downloaded 0.02 GB:  22%|##2       | 18/81 [00:00<00:01, 32.49it/s]
Downloaded 0.02 GB:  22%|##2       | 18/81 [00:00<00:01, 32.49it/s]
Downloaded 0.02 GB:  22%|##2       | 18/81 [00:00<00:01, 32.49it/s]
Downloaded 0.02 GB:  22%|##2       | 18/81 [00:00<00:01, 32.49it/s]
Downloaded 0.02 GB:  28%|##8       | 23/81 [00:00<00:01, 35.80it/s]
Downloaded 0.02 GB:  28%|##8       | 23/81 [00:00<00:01, 35.80it/s]
Downloaded 0.02 GB:  28%|##8       | 23/81 [00:00<00:01, 35.80it/s]
Downloaded 0.03 GB:  28%|##8       | 23/81 [00:00<00:01, 35.80it/s]
Downloaded 0.03 GB:  28%|##8       | 23/81 [00:00<00:01, 35.80it/s]
Downloaded 0.03 GB:  28%|##8       | 23/81 [00:01<00:01, 35.80it/s]
Downloaded 0.03 GB:  35%|###4      | 28/81 [00:01<00:01, 37.36it/s]
Downloaded 0.03 GB:  35%|###4      | 28/81 [00:01<00:01, 37.36it/s]
Downloaded 0.03 GB:  35%|###4      | 28/81 [00:01<00:01, 37.36it/s]
Downloaded 0.03 GB:  35%|###4      | 28/81 [00:01<00:01, 37.36it/s]
Downloaded 0.03 GB:  35%|###4      | 28/81 [00:01<00:01, 37.36it/s]
Downloaded 0.03 GB:  35%|###4      | 28/81 [00:01<00:01, 37.36it/s]
Downloaded 0.03 GB:  41%|####      | 33/81 [00:01<00:01, 39.09it/s]
Downloaded 0.03 GB:  41%|####      | 33/81 [00:01<00:01, 39.09it/s]
Downloaded 0.03 GB:  41%|####      | 33/81 [00:01<00:01, 39.09it/s]
Downloaded 0.04 GB:  41%|####      | 33/81 [00:01<00:01, 39.09it/s]
Downloaded 0.04 GB:  41%|####      | 33/81 [00:01<00:01, 39.09it/s]
Downloaded 0.04 GB:  41%|####      | 33/81 [00:01<00:01, 39.09it/s]
Downloaded 0.04 GB:  47%|####6     | 38/81 [00:01<00:01, 40.49it/s]
Downloaded 0.04 GB:  47%|####6     | 38/81 [00:01<00:01, 40.49it/s]
Downloaded 0.04 GB:  47%|####6     | 38/81 [00:01<00:01, 40.49it/s]
Downloaded 0.04 GB:  47%|####6     | 38/81 [00:01<00:01, 40.49it/s]
Downloaded 0.04 GB:  47%|####6     | 38/81 [00:01<00:01, 40.49it/s]
Downloaded 0.04 GB:  47%|####6     | 38/81 [00:01<00:01, 40.49it/s]
Downloaded 0.04 GB:  53%|#####3    | 43/81 [00:01<00:00, 41.50it/s]
Downloaded 0.04 GB:  53%|#####3    | 43/81 [00:01<00:00, 41.50it/s]
Downloaded 0.04 GB:  53%|#####3    | 43/81 [00:01<00:00, 41.50it/s]
Downloaded 0.04 GB:  53%|#####3    | 43/81 [00:01<00:00, 41.50it/s]
Downloaded 0.05 GB:  53%|#####3    | 43/81 [00:01<00:00, 41.50it/s]
Downloaded 0.05 GB:  53%|#####3    | 43/81 [00:01<00:00, 41.50it/s]
Downloaded 0.05 GB:  59%|#####9    | 48/81 [00:01<00:00, 41.43it/s]
Downloaded 0.05 GB:  59%|#####9    | 48/81 [00:01<00:00, 41.43it/s]
Downloaded 0.05 GB:  59%|#####9    | 48/81 [00:01<00:00, 41.43it/s]
Downloaded 0.05 GB:  59%|#####9    | 48/81 [00:01<00:00, 41.43it/s]
Downloaded 0.05 GB:  59%|#####9    | 48/81 [00:01<00:00, 41.43it/s]
Downloaded 0.05 GB:  59%|#####9    | 48/81 [00:01<00:00, 41.43it/s]
Downloaded 0.05 GB:  65%|######5   | 53/81 [00:01<00:00, 41.87it/s]
Downloaded 0.05 GB:  65%|######5   | 53/81 [00:01<00:00, 41.87it/s]
Downloaded 0.05 GB:  65%|######5   | 53/81 [00:01<00:00, 41.87it/s]
Downloaded 0.05 GB:  65%|######5   | 53/81 [00:01<00:00, 41.87it/s]
Downloaded 0.06 GB:  65%|######5   | 53/81 [00:01<00:00, 41.87it/s]
Downloaded 0.06 GB:  65%|######5   | 53/81 [00:01<00:00, 41.87it/s]
Downloaded 0.06 GB:  72%|#######1  | 58/81 [00:01<00:00, 42.45it/s]
Downloaded 0.06 GB:  72%|#######1  | 58/81 [00:01<00:00, 42.45it/s]
Downloaded 0.06 GB:  72%|#######1  | 58/81 [00:01<00:00, 42.45it/s]
Downloaded 0.06 GB:  72%|#######1  | 58/81 [00:01<00:00, 42.45it/s]
Downloaded 0.06 GB:  72%|#######1  | 58/81 [00:01<00:00, 42.45it/s]
Downloaded 0.06 GB:  72%|#######1  | 58/81 [00:01<00:00, 42.45it/s]
Downloaded 0.06 GB:  78%|#######7  | 63/81 [00:01<00:00, 42.82it/s]
Downloaded 0.06 GB:  78%|#######7  | 63/81 [00:01<00:00, 42.82it/s]
Downloaded 0.06 GB:  78%|#######7  | 63/81 [00:01<00:00, 42.82it/s]
Downloaded 0.06 GB:  78%|#######7  | 63/81 [00:01<00:00, 42.82it/s]
Downloaded 0.07 GB:  78%|#######7  | 63/81 [00:01<00:00, 42.82it/s]
Downloaded 0.07 GB:  78%|#######7  | 63/81 [00:01<00:00, 42.82it/s]
Downloaded 0.07 GB:  84%|########3 | 68/81 [00:01<00:00, 43.16it/s]
Downloaded 0.07 GB:  84%|########3 | 68/81 [00:01<00:00, 43.16it/s]
Downloaded 0.07 GB:  84%|########3 | 68/81 [00:01<00:00, 43.16it/s]
Downloaded 0.07 GB:  84%|########3 | 68/81 [00:02<00:00, 43.16it/s]
Downloaded 0.07 GB:  84%|########3 | 68/81 [00:02<00:00, 43.16it/s]
Downloaded 0.07 GB:  84%|########3 | 68/81 [00:02<00:00, 43.16it/s]
Downloaded 0.07 GB:  90%|######### | 73/81 [00:02<00:00, 41.74it/s]
Downloaded 0.07 GB:  90%|######### | 73/81 [00:02<00:00, 41.74it/s]
Downloaded 0.07 GB:  90%|######### | 73/81 [00:02<00:00, 41.74it/s]
Downloaded 0.07 GB:  90%|######### | 73/81 [00:02<00:00, 41.74it/s]
Downloaded 0.08 GB:  90%|######### | 73/81 [00:02<00:00, 41.74it/s]
Downloaded 0.08 GB:  90%|######### | 73/81 [00:02<00:00, 41.74it/s]
Downloaded 0.08 GB:  96%|#########6| 78/81 [00:02<00:00, 42.43it/s]
Downloaded 0.08 GB:  96%|#########6| 78/81 [00:02<00:00, 42.43it/s]
Downloaded 0.08 GB:  96%|#########6| 78/81 [00:02<00:00, 42.43it/s]
Downloaded 0.08 GB:  96%|#########6| 78/81 [00:02<00:00, 42.43it/s]
Downloaded 0.08 GB: 100%|##########| 81/81 [00:02<00:00, 36.54it/s]
Extracting dataset/arxiv.zip
Loading necessary files...
This might take a while.
Processing graphs...

  0%|          | 0/1 [00:00<?, ?it/s]
100%|##########| 1/1 [00:00<00:00, 23967.45it/s]
Converting graphs into DGL objects...

  0%|          | 0/1 [00:00<?, ?it/s]
100%|##########| 1/1 [00:00<00:00, 249.19it/s]
Saving...
OGB dataset is a collection of graphs and their labels. ogbn-arxiv
dataset only contains a single graph. So you can
simply get the graph and its node labels like this:
graph, node_labels = dataset[0]
# Add reverse edges since ogbn-arxiv is unidirectional.
graph = dgl.add_reverse_edges(graph)
graph.ndata['label'] = node_labels[:, 0]
print(graph)
print(node_labels)

node_features = graph.ndata['feat']
num_features = node_features.shape[1]
num_classes = (node_labels.max() + 1).item()
print('Number of classes:', num_classes)
Out:
Graph(num_nodes=169343, num_edges=2332486,
      ndata_schemes={'year': Scheme(shape=(1,), dtype=torch.int64), 'feat': Scheme(shape=(128,), dtype=torch.float32), 'label': Scheme(shape=(), dtype=torch.int64)}
      edata_schemes={})
tensor([[ 4],
        [ 5],
        [28],
        ...,
        [10],
        [ 4],
        [ 1]])
Number of classes: 40
You can get the training-validation-test split of the nodes with
get_split_idx method.
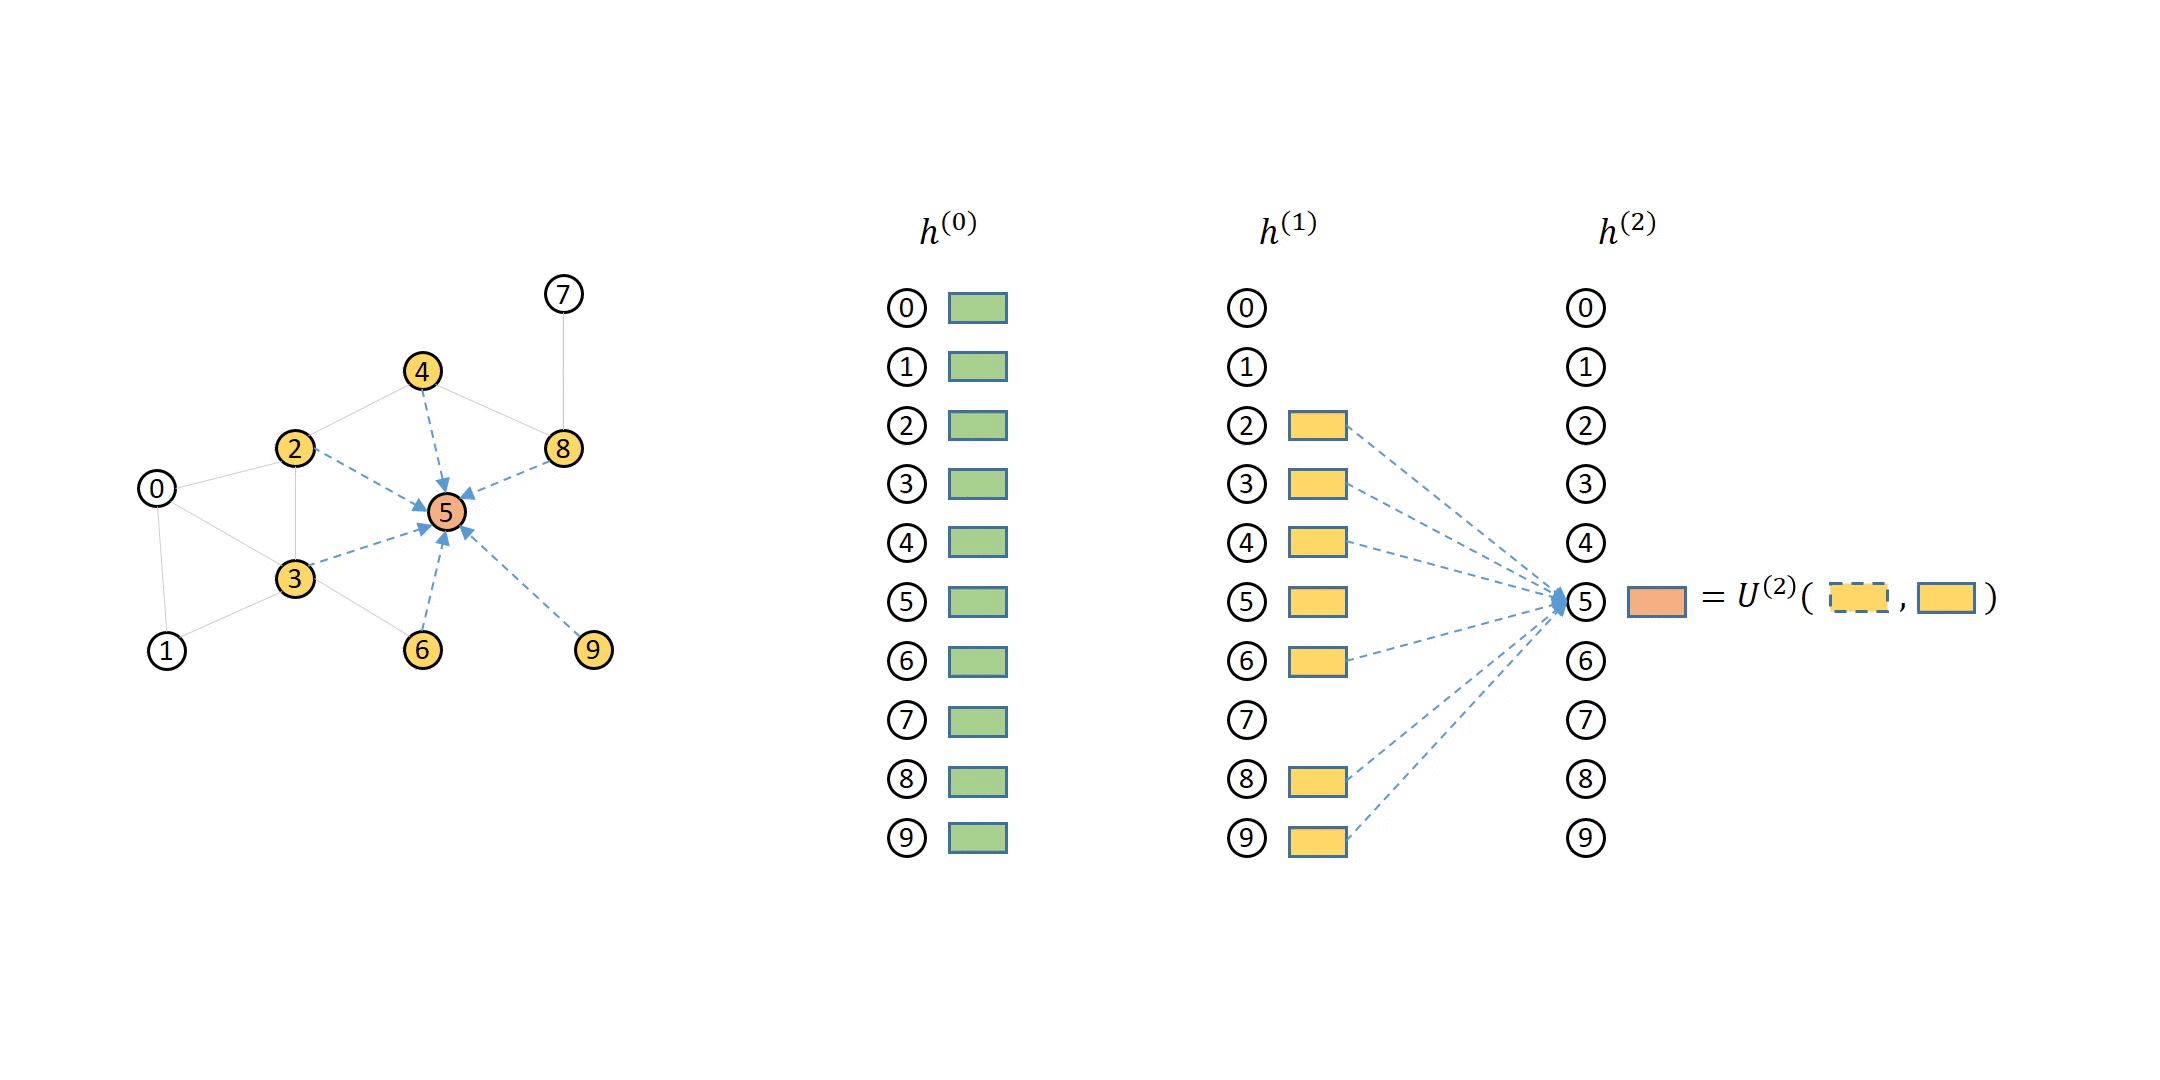
How DGL Handles Computation Dependency
In the previous tutorial, you have seen that the computation dependency for message passing of a single node can be described as a series of message flow graphs (MFG).
Defining Neighbor Sampler and Data Loader in DGL
DGL provides tools to iterate over the dataset in minibatches
while generating the computation dependencies to compute their outputs
with the MFGs above. For node classification, you can use
dgl.dataloading.DataLoader for iterating over the dataset.
It accepts a sampler object to control how to generate the computation
dependencies in the form of MFGs. DGL provides
implementations of common sampling algorithms such as
dgl.dataloading.NeighborSampler which randomly picks
a fixed number of neighbors for each node.
Note
To write your own neighbor sampler, please refer to this user guide section.
The syntax of dgl.dataloading.DataLoader is mostly similar to a
PyTorch DataLoader, with the addition that it needs a graph to
generate computation dependency from, a set of node IDs to iterate on,
and the neighbor sampler you defined.
Let’s say that each node will gather messages from 4 neighbors on each layer. The code defining the data loader and neighbor sampler will look like the following.
sampler = dgl.dataloading.NeighborSampler([4, 4])
train_dataloader = dgl.dataloading.DataLoader(
    # The following arguments are specific to DGL's DataLoader.
    graph,              # The graph
    train_nids,         # The node IDs to iterate over in minibatches
    sampler,            # The neighbor sampler
    device=device,      # Put the sampled MFGs on CPU or GPU
    # The following arguments are inherited from PyTorch DataLoader.
    batch_size=1024,    # Batch size
    shuffle=True,       # Whether to shuffle the nodes for every epoch
    drop_last=False,    # Whether to drop the last incomplete batch
    num_workers=0       # Number of sampler processes
)
Note
Since DGL 0.7 neighborhood sampling on GPU is supported. Please refer to 6.7 Using GPU for Neighborhood Sampling if you are interested.
You can iterate over the data loader and see what it yields.
input_nodes, output_nodes, mfgs = example_minibatch = next(iter(train_dataloader))
print(example_minibatch)
print("To compute {} nodes' outputs, we need {} nodes' input features".format(len(output_nodes), len(input_nodes)))
Out:
[tensor([ 72971, 135403, 103253,  ..., 141597, 100640,  55850]), tensor([ 72971, 135403, 103253,  ...,  88286,  87333, 103306]), [Block(num_src_nodes=12541, num_dst_nodes=4026, num_edges=14517), Block(num_src_nodes=4026, num_dst_nodes=1024, num_edges=3220)]]
To compute 1024 nodes' outputs, we need 12541 nodes' input features
DGL’s DataLoader gives us three items per iteration.
An ID tensor for the input nodes, i.e., nodes whose input features are needed on the first GNN layer for this minibatch.
An ID tensor for the output nodes, i.e. nodes whose representations are to be computed.
A list of MFGs storing the computation dependencies for each GNN layer.
You can get the source and destination node IDs of the MFGs and verify that the first few source nodes are always the same as the destination nodes. As we described in the overview, destination nodes’ own features from the previous layer may also be necessary in the computation of the new features.
Out:
tensor([ 72971, 135403, 103253,  ..., 141597, 100640,  55850])
tensor([ 72971, 135403, 103253,  ...,  41243, 158958, 104469])
True
Defining Model
Let’s consider training a 2-layer GraphSAGE with neighbor sampling. The model can be written as follows:
import torch.nn as nn
import torch.nn.functional as F
from dgl.nn import SAGEConv

class Model(nn.Module):
    def __init__(self, in_feats, h_feats, num_classes):
        super(Model, self).__init__()
        self.conv1 = SAGEConv(in_feats, h_feats, aggregator_type='mean')
        self.conv2 = SAGEConv(h_feats, num_classes, aggregator_type='mean')
        self.h_feats = h_feats

    def forward(self, mfgs, x):
        # Lines that are changed are marked with an arrow: "<---"

        h_dst = x[:mfgs[0].num_dst_nodes()]  # <---
        h = self.conv1(mfgs[0], (x, h_dst))  # <---
        h = F.relu(h)
        h_dst = h[:mfgs[1].num_dst_nodes()]  # <---
        h = self.conv2(mfgs[1], (h, h_dst))  # <---
        return h

model = Model(num_features, 128, num_classes).to(device)
If you compare against the code in the introduction, you will notice several differences:
DGL GNN layers on MFGs. Instead of computing on the full graph:
h = self.conv1(g, x)
you only compute on the sampled MFG:
h = self.conv1(mfgs[0], (x, h_dst))
All DGL’s GNN modules support message passing on MFGs, where you supply a pair of features, one for source nodes and another for destination nodes.
Feature slicing for self-dependency. There are statements that perform slicing to obtain the previous-layer representation of the
nodes:
h_dst = x[:mfgs[0].num_dst_nodes()]
num_dst_nodesmethod works with MFGs, where it will return the number of destination nodes.Since the first few source nodes of the yielded MFG are always the same as the destination nodes, these statements obtain the representations of the destination nodes on the previous layer. They are then combined with neighbor aggregation in
dgl.nn.SAGEConvlayer.
Note
See the custom message passing
tutorial for more details on how to
manipulate MFGs produced in this way, such as the usage
of num_dst_nodes.
Defining Training Loop
The following initializes the model and defines the optimizer.
opt = torch.optim.Adam(model.parameters())
When computing the validation score for model selection, usually you can also do neighbor sampling. To do that, you need to define another data loader.
valid_dataloader = dgl.dataloading.DataLoader(
    graph, valid_nids, sampler,
    batch_size=1024,
    shuffle=False,
    drop_last=False,
    num_workers=0,
    device=device
)
The following is a training loop that performs validation every epoch. It also saves the model with the best validation accuracy into a file.
import tqdm
import sklearn.metrics

best_accuracy = 0
best_model_path = 'model.pt'
for epoch in range(10):
    model.train()

    with tqdm.tqdm(train_dataloader) as tq:
        for step, (input_nodes, output_nodes, mfgs) in enumerate(tq):
            # feature copy from CPU to GPU takes place here
            inputs = mfgs[0].srcdata['feat']
            labels = mfgs[-1].dstdata['label']

            predictions = model(mfgs, inputs)

            loss = F.cross_entropy(predictions, labels)
            opt.zero_grad()
            loss.backward()
            opt.step()

            accuracy = sklearn.metrics.accuracy_score(labels.cpu().numpy(), predictions.argmax(1).detach().cpu().numpy())

            tq.set_postfix({'loss': '%.03f' % loss.item(), 'acc': '%.03f' % accuracy}, refresh=False)

    model.eval()

    predictions = []
    labels = []
    with tqdm.tqdm(valid_dataloader) as tq, torch.no_grad():
        for input_nodes, output_nodes, mfgs in tq:
            inputs = mfgs[0].srcdata['feat']
            labels.append(mfgs[-1].dstdata['label'].cpu().numpy())
            predictions.append(model(mfgs, inputs).argmax(1).cpu().numpy())
        predictions = np.concatenate(predictions)
        labels = np.concatenate(labels)
        accuracy = sklearn.metrics.accuracy_score(labels, predictions)
        print('Epoch {} Validation Accuracy {}'.format(epoch, accuracy))
        if best_accuracy < accuracy:
            best_accuracy = accuracy
            torch.save(model.state_dict(), best_model_path)

        # Note that this tutorial do not train the whole model to the end.
        break
Out:
  0%|          | 0/89 [00:00<?, ?it/s]/home/ubuntu/.pyenv/versions/miniconda3-latest/lib/python3.7/site-packages/torch/autocast_mode.py:141: UserWarning: User provided device_type of 'cuda', but CUDA is not available. Disabling
  warnings.warn('User provided device_type of \'cuda\', but CUDA is not available. Disabling')

  4%|4         | 4/89 [00:00<00:02, 32.03it/s, loss=3.620, acc=0.048]
  9%|8         | 8/89 [00:00<00:02, 31.18it/s, loss=3.199, acc=0.235]
 13%|#3        | 12/89 [00:00<00:02, 29.07it/s, loss=3.069, acc=0.220]
 18%|#7        | 16/89 [00:00<00:02, 29.52it/s, loss=2.901, acc=0.255]
 22%|##2       | 20/89 [00:00<00:02, 29.54it/s, loss=2.899, acc=0.267]
 27%|##6       | 24/89 [00:00<00:02, 29.71it/s, loss=2.729, acc=0.319]
 30%|###       | 27/89 [00:00<00:02, 29.61it/s, loss=2.736, acc=0.301]
 34%|###3      | 30/89 [00:01<00:02, 28.97it/s, loss=2.678, acc=0.289]
 38%|###8      | 34/89 [00:01<00:01, 30.62it/s, loss=2.623, acc=0.302]
 43%|####2     | 38/89 [00:01<00:01, 29.41it/s, loss=2.533, acc=0.336]
 47%|####7     | 42/89 [00:01<00:01, 29.27it/s, loss=2.415, acc=0.382]
 51%|#####     | 45/89 [00:01<00:01, 28.78it/s, loss=2.341, acc=0.375]
 54%|#####3    | 48/89 [00:01<00:01, 28.33it/s, loss=2.241, acc=0.415]
 57%|#####7    | 51/89 [00:01<00:01, 28.61it/s, loss=2.315, acc=0.389]
 62%|######1   | 55/89 [00:01<00:01, 29.25it/s, loss=2.299, acc=0.419]
 65%|######5   | 58/89 [00:01<00:01, 28.45it/s, loss=2.174, acc=0.435]
 69%|######8   | 61/89 [00:02<00:00, 28.39it/s, loss=2.106, acc=0.463]
 72%|#######1  | 64/89 [00:02<00:00, 28.40it/s, loss=2.201, acc=0.428]
 75%|#######5  | 67/89 [00:02<00:00, 28.00it/s, loss=2.051, acc=0.476]
 79%|#######8  | 70/89 [00:02<00:00, 28.55it/s, loss=2.052, acc=0.462]
 82%|########2 | 73/89 [00:02<00:00, 27.64it/s, loss=2.003, acc=0.475]
 85%|########5 | 76/89 [00:02<00:00, 27.61it/s, loss=1.888, acc=0.506]
 90%|########9 | 80/89 [00:02<00:00, 28.66it/s, loss=1.919, acc=0.509]
 93%|#########3| 83/89 [00:02<00:00, 28.30it/s, loss=1.856, acc=0.530]
 97%|#########6| 86/89 [00:02<00:00, 28.61it/s, loss=1.858, acc=0.525]
100%|##########| 89/89 [00:03<00:00, 28.73it/s, loss=1.814, acc=0.514]
100%|##########| 89/89 [00:03<00:00, 28.92it/s, loss=1.814, acc=0.514]

  0%|          | 0/30 [00:00<?, ?it/s]
 20%|##        | 6/30 [00:00<00:00, 53.50it/s]
 40%|####      | 12/30 [00:00<00:00, 55.19it/s]
 60%|######    | 18/30 [00:00<00:00, 55.32it/s]
 80%|########  | 24/30 [00:00<00:00, 53.43it/s]
100%|##########| 30/30 [00:00<00:00, 55.40it/s]
Epoch 0 Validation Accuracy 0.5480385247827109
Conclusion
In this tutorial, you have learned how to train a multi-layer GraphSAGE with neighbor sampling.
What’s next?
During inference you may wish to disable neighbor sampling. If so, please refer to the user guide on exact offline inference.
# Thumbnail credits: Stanford CS224W Notes
# sphinx_gallery_thumbnail_path = '_static/blitz_1_introduction.png'
Total running time of the script: ( 0 minutes 10.831 seconds)